Thursday, October 18, 2012

Commence Operation Elmo

My son's second birthday party is less than 2 weeks away; let the Elmo madness begin!

The countdown has begun, and to top it off...I've been home sick from work for two days now. Since I was planning on blogging my party planning journey anyway, I guess there's no better time to sit and type than when you're laid up on the couch. And might I just state for the record, daytime television sucks! Whew, now that I've gotten that out; back to my son's upcoming party!

I will admit, I sometimes wish that my son's birthday fell in the summer months rather than the end of October, simply because I could invite more people if we could put up a nice tent out in the yard. Alas, that's not the case, so we're happy to celebrate with a more intimate guest list...but that doesn't mean we have to have a tame little sit down either!

So, with the big day coming soon, it's time to really get started on the cake! As for the rest of my party planning, I have a spreadsheet (naturally), complete with time lines, color coding and lists. Since I'm planning on doing a nice treat table complete with Oreo & Cake Pops, Iced sugar cookies and a yummy sweet chex mix; next week is going to be a nightly dough making, cookie decorating, cake batter mixing, baking and freezing extravaganza!

If you've read some of my more recent cake posts, you'll see that my love affair with fondant ended almost as soon as it began. I chose to nix covering the cake with all fondant and just do a nice, smooth, butter cream with fondant accents. I did my research and I discovered that it's best to make the fondant accents as far as 2 weeks in advance so to give them adequate drying time which will reduce the possibility of colors bleeding into the butter cream.

I've been slowly buying my supplies from my local craft store for the past few months, one 40% off one item coupon at a time! I've also rummaged through my mom's cake supplies. Between the two of us, I've got enough supplies to get this party started!

 
For my fondants, I went with Wilton's white, black and red. I'd heard that tinting fondant black was a messy and difficult task, so I went the easy route and just bought it that way. For Elmo's cute little orange nose, I opted to color it myself.
 
 
This weekend, I rolled out my fondant and got my cut outs done! Whew! One less thing to worry about as the party starts inching closer and closer!


The hardest part for me was getting Elmo's eyes the same size and shape! You would think rolling fondant into a ball would be easier! I wound up using my kitchen scale to ensure that they were both the same weight, so at least I know they'll be similar in size!

 
So, stay tuned and wish me luck, as I embark on Operation Elmo!

Wednesday, September 19, 2012

My First Macaroon!

I would love to say that I skipped ahead multiple chapters in my baking text book and tackled Macaroons; but that would be a lie. I looked at the macaroon recipe in the CIA text and there was little more than a list of ingredients and some abbreviated instructions.

From what I know of making Macaroons, it's a complicated and delicate process. How else would we wind up with these lovely little footed cookie looking things? So, I visited Heather's blog and found a recipe for French Macaroons. Oh Heather, what would I do without you? I promise...I'm going to buy your cookbook soon!!

It was an interesting afternoon as my husband was wiring up a light switch a few feet from where I was working in the kitchen. I tend to be a solitary creature in the kitchen and seldom have to contend with someone in "my space"; so a few of my photos have some tools in the background.

With the whirring sound coming from my stand mixer and the grinding of my husband's oscillating saw I whipped up some lovely egg whites and sugar;


The folding was fun! I've never been a confident 'folder', but Heather's instructions were helpful! Once I got my batter all set, I tinted it pink (naturally) and piped my little blobs out.
 
 
I will admit, I was scared. Scared that I wouldn't get the coveted "feet" on my macaroons. I think I stopped back and stared at my oven more than a few times. When I turned my baking sheet halfway through the baking process, I noticed that I was actually getting some lovely little ruffles at the base of my macaroons!
 
Once baking had completed, this is what I had:
 
 
I whipped up a simple butter cream, substituting my normal vanilla extract for some almond extract I picked up from the Penzeys store in Delafield. It was yummy!
 
 
They were a hit! When I brought some over to my sister, she practically ran out of her room when she heard the word Macaroon! My son was a big fan too, he polished off three!


I think now that I've attacked cheesecake, bread and macaroons I'm off to a great start! I've been finding that you just need to get out there and try a new recipe, you might be pleasantly surprised with what you can do!


Sunday, September 9, 2012

Rhapsody in Rye

I'm back in the kitchen, and have returned with a triumphant tale of bread making!

My next recipe to tackle contained a new flour that I've yet to deal with...rye flour. Ladies and gentlemen, I present Cheddar and Onion Rye Dough!

This recipe will yield 2 round loaves:

Bread Flour 15.25oz
Rye Flour 4.75oz
Instant Dry Yeast 3.5g
Water 14.25 fl oz
Salt 0.5oz
Sugar 10.75g
Molasses, Unsulfured 10.75g
Vegetable Oil 10.75g
Cheddar Cheese, Shredded 4oz
Yellow Onions, Medium Dice 4oz


This recipe begins as most bread recipes do. We mix the flours and yeast in one bowl and the water, salt, sugar, molasses in the mixer bowl. Add the flour/yeast mix to the mixing bowl and mix on slow, with the dough hook attachment for 4 minutes. Once 4 minutes have passed, crank it up to medium for another 4 minutes before adding the onions and cheese. Mix on low for another 2 minutes and...Voila! We have made dough!

I will give you a warning, the dough gets really sticky once the cheese and onions are added in. There is a lot of moisture in onions and you wont have your usual firm ball of dough.

We allow the dough to rise (covered with a little plastic wrap) for about 45 minutes.


Once the rising period has completed, it's time to give our lovely dough a nice, gentle fold in the bowl (careful, we're getting into some very sticky territory), before turning the dough (or dumping and scraping in my case) onto the work surface, dusted with some bread flour.

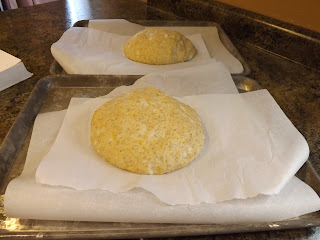
It is now time to commence preshaping. I divided the dough wad in half and preshaped into two large rounds (see Lean Dough Take II for preshaping instructions). Once preshaped, allow the dough to rest, covered, for about 15 to 20 minutes.

I know what you're thinking...nice huh?
 
This recipe was actually meant to be rolls, but I was really in the mood for a few actual rustic looking loaves of bread, so I hearkened back to my first successful bread recipe (Lean Dough Take II) and decided to make two boules of bread instead!
 
Now that my lovely lady lumps of dough have rested, it's time to shape up to bake! I reformed the balls into new balls (or boules) and let them proof, covered, in a warmed (then switched off) oven for about 45 minutes, while I preheated my other oven to 425 degrees.

 
As you can see, the dough grew substantially during the final proofing! You'll want your dough to spring back halfway, slowly, to the touch but not collapse!
 
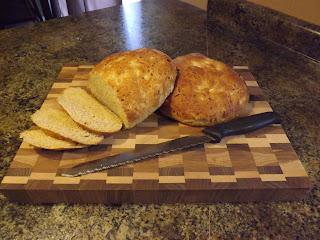
You should score your boules before throwing them into the oven, but I'll admit, I forgot. Not to worry, as the bread came out great! About 15-20 minutes in the oven and I wound up with this:
 
 
You'll know that your bread is done when you thump the loaf on the bottom and hear a hollow sound. Be sure to donn an oven mitt...or risk burning your paws!
 
 
This bread has replaced my Challah as my finest baking trial to date! It was so moist and yummy! Even if you're not a cheese or onion fan, I think you'd like this! The cheese is very understated and the onions seem to make the bread all the more moist! It received high marks around here, and with my extended family across the street!
 
For my next trick...I've been obsessing in the back of my mind with making macaroons lately! I think they're so pretty and would be a fun addition to my son's upcoming birthday celebration! It would be skipping forward quite a bit in my text book, but what the hell! I think I'm up for the challenge!
 
Happy Baking!


Monday, August 13, 2012

More Fun with Fondant!

In my ongoing effort to learn the fine art that is fondant, I made yet another attempt at some lovely fondant fun!

Since I'm all about baking from scratch now (and I'm trying to get my poop in a group for my Son's birthday party in October), I was looking for a good confetti cake recipe. I found one on Heather's Sprinklebakes site and was revved up and ready to go!

I mixed up my lovely batter and dumped the sprinkles in with glee! This is WAY more fun than that crappy little packet of sprinkles they give you in the box of cake mix! This recipe takes a good 3/4 cup!!


I unearthed a few 8 inch pans, lined the bottoms with parchment paper (makes getting it out of the pan so very easy) and got my batter ready to go:


My cakes came out looking great! I let them cool and got my butter cream whipped up. I'm really digging this recipe I found on Food Network's website. I find that a batch and a half is just enough for two 8 inch cakes.

Now, the last (and first) time I did a fondant cake I ran into issues with creasing at the base of the cake. I rolled the fondant much thinner than the last time, and managed to get the fondant on the cake without incident or creases! YAY Me!

I did, however, run into a bit of a bulging issue around the mid section of the cake. Picture a gal with a muffin top in a pair of low rise jeans. I did some poking around on the net today and found that I need to put the butter cream between the layers about an inch away from the edge and should have probably let the cake settle for a few hours before putting the fondant on. Lesson learned!

Once decorated, this is what I managed to come up with:


My Momma was making tacos across the street and invited us over for dinner last night, and this made the perfect ending to a lovely meal!


The cake was SUPER moist and such fun! I would recommend this over a 'cake in a box' any day!


Want some cake?

Now, for what I've learned today.

I don't really like fondant.

It looks pretty, tastes OK (and that's only after I flavor it), but the texture is a little off putting. I don't like to serve my desserts with the disclaimer "if you don't like the fondant, just scrape it off". I think fondant is great for a wedding cake (here in Wisconsin, we're usually hammered by the time the cake is served), or one of those fancy show cakes; but for something you're actually looking to eat and enjoy, maybe with a scoop of New York Vanilla...meh. Not my thing.  

I've decided I'm going to try and concentrate on making my butter cream look as smooth as possible and decorate it with fondant cut outs for my son's party! I've already started my research and just need to get some more practice in before October 29th!

Tune back in soon, I've about a thousand more pages in my CIA text book and I'm cruising right along!


Monday, August 6, 2012

Splendid Sunflower Seed Rolls

What else to do on a lovely Sunday morning? Sleep in? Negative, a toddler lives in my house. The weather outside was actually nice enough to cut off the central air and open the windows, why not bake?! Time to get to work on my next project; Sunflower Seed Rolls!

Wheat Bran 3oz
Milk, room temperature 22.5 fl oz
Bread Flour 1 pound 10oz
Instant Dry Yeast 4.75 g
Honey 2oz
Sunflower Seed Oil (I didn't have this on hand, so I used Vegetable Oil) 1.5oz
Salt 17.75g
Sunflower Seeds lightly toasted, plus more for garnish 3oz (+ 2 extra ounces for garnish)


This project actually began the evening prior. The wheat bran needs to soak overnight in the milk. I put the mixture in the fridge overnight, and took it out first thing in the morning to let it come to room temperature. I've found that if it's not warming up fast enough, putting the container in the sink and filling it (the sink, not the milk/bran container) up with warmer water can speed things up if needed.

The sunflower seeds needed to be lightly toasted, so I threw them onto a sheet pan and stuck them under the broiler for a few minutes, just until the natural oils started to come out. Yummy! It was all I could do to keep from snacking on them while I was baking!

This recipe does call for sunflower seed oil, but my grocery store didn't have it. After a quick google search, I discovered that you can substitute vegetable oil, so, substitute I did!

The flour and yeast are combined in one bowl, and all other ingredients, except for the sesame seeds, go into the mixing bowl. The flour/yeast mixture is added to the mixer and mixed on low, with the dough hood attachment,  for 4 minutes. Then we upped the speed to medium and mixed for another 4 1/2 minutes.

Now we add the sunflower seeds and mix for another 2 minutes on low.


Now for the waiting, the dough needs to bulk ferment for about an hour. I covered the dough lightly with a dampened tea towel so I could avoid getting a "skin" on it.

I was feeling particularly creative on this fine afternoon, and, since I was in the kitchen anyways, I made my son a lovely "you eat with your eyes before you shove it in your face" lunch!

Cute Huh?

Once the dough had risen, it was time to preshape the dough into a large round. I'm actually getting pretty good at this! Check out Lean Dough Take II for preshaping instructions. Once preshaped, let the dough rest, covered, for about 15 to 20 minutes.

Now that we're all well rested, it's time to make our cute little rolls! Divide the dough into 38g pieces with a dough blade and kitchen scale.


Once divided, time to conquer! I'm going to just quote the textbook here, as they explain it better than I think I could!

Shaping the rolls was easy, but time consuming because there's so many of them! "Press each piece lightly with fingertips to flatten. Fold the top edge of the dough to the center of the dough, pressing lightly with fingertips to tighten the dough. Rotate the dough 90 degrees, fold the dough in half, and use the heel of your hand to seal the two edges together. Cup the roll in your hand and re round the dough, applying gentle pressure to create a tight, smooth ball."


Place the rolls onto parchment lined baking sheets and brush with an egg wash. I've used two different methods of egg washing. One is egg and water, the other is equal parts egg and milk with a small pinch of salt. I'm finding that I'm partial to the egg/milk wash. Now is a good time to get ready for proofing. I head up my double ovens to about 100 degrees each for a few minutes, then turn them off. Just to get them warmer than the temperature in the kitchen.


Once, egg washed. I covered all my little dough balls with tea towels and put them into my warm ovens to proof for about 40-50 minutes. I was delighted to see that the dough had proofed beautifully! The dough sprung back a bit to the touch, but didn't collapse and had grown in size nicely!


Now, we egg wash again and top with sunflower seeds. You'll want to be really careful when egg washing the rolls once they've proofed, because you could actually collapse the rolls if you jab them to hard with the basting brush!

And now, we bake! I actually don't have a convection oven. I've had them before, and I've found that they can dry out baked goods. When it was time to pick appliances for the new house, I was totally fine with conventional ovens! The instructions in the text state to bake at 410 degrees in a convection oven for about 15 minutes. I've found a handy website that gave me the conversion trick for convection to conventional ovens. The formula is to add 25 degrees and 33% more time. This put me at 435 degrees for about 19 minutes.

The rolls are done when they sound hollow when thumped on the bottom and are a nice golden brown.


If you can manage to wait, let the rolls cool completely on wire racks. These were nutty, a little crunchy and delightful! My Hubs and Son LOVE them! They also make cute little burger buns!

Yummy!

I asked my son what he wanted for dinner, and he answered with an emphatic "noodles"! Needless to say, these were a great addition to our spaghetti dinner! I would encourage anyone to try these out! They are a bit of work, but the end result is fantastic!


On a side note...I've graduated from my iPhone camera to a big girl camera and have been psyched by the pictures I've been able to take!

Monday, July 23, 2012

My First Foray into Fondant!

What an exciting weekend!

It all began when I got the ambitious idea to make my son's cake for his second birthday party in October. I found this adorable Elmo cake on the net and decided that there was no reason for me to shell out another $80 for a fancy fondant cake like I did for the last party, by golly...I'm making it myself! Ambitious, no?

Ambitious, and quite the undertaking. The cake I found it a three tiered masterpiece, covered in...DUM DUM DAAAAAAHHHHHH...fondant.

This is what I knew about fondant as of last week:

1. My mom, the cake decorator, wouldn't touch the stuff. She's old school, royal icing all the way!
2. Fondant tastes funny
3. Fondant instantly makes a cake more expensive
4. Fondant looks AMAZING on all those Food Network Cake Challenge Shows...NO WAY I can pull that off at home.

Well, I decided if I'm going to make my son's cake, I needed practice. We were planning on hosting my mother in law's birthday celebration at our house on Sunday anyways, so why not just start my practice with that! I decided that if the fondant failed, I'd just rip it of and ice it in butter cream. No harm, no foul.

I did a lot of research on the net in the week leading up to the party and grabbed a few basic fondant items from the local craft store. I purchased a box of Wilton's fondant, a large fondant rolling pin, some circle cutters, and a fondant smoother and I was ready to go.

I chose to do a simple white cake from my big, red, Betty Crocker's Cookbook. I went with the "Silver White Cake".

2 1/2 Cups Cake Flour
1 2/3 Cups Sugar
2/3 Cups Shortening
1 1/4 Cups Milk
3 1/2 Teaspoons Baking Powder
1 Teaspoon Salt
1 Teaspoon Vanilla or Almond Extract (When given the choice, I ALWAYS use Almond)
5 Large Egg Whites

My preference for almond extract over vanilla goes back to my childhood. My grandmother and my mother always used the same Christmas cookie recipe with one difference, Mom used vanilla extract, Grandma used almond. I loved both cookies...but there was always something about Grandma's that had me revisiting that cookie plate at Christmas. Once I was of the age where making Christmas cookies became important to me, I asked my grandma if she did something different than my mom...her answer, almond extract. From that day on, I was an almond extract convert!

Friday night rolled around, my son is in bed, time to bake the cakes! I gathered up my ingredients and got to work.


I preheated the oven to 350 degrees and greased up a couple 8 inch round cake pans. I also lined the bottoms of the pans with some parchment paper, which makes getting the cakes out of the pans SUPER easy!

I mixed all the ingredients except the egg whites in my stand mixer on low for about 30 seconds (scraping bowl), then on high speed for another 2 minutes (again, scraping bowl).Then I beat in the egg whites, on high, for an additional 2 minutes before pouring into my pans.


I baked for about 25 minutes or so, until the cake sprung back when touched, and cooled for a few minutes on the rack before turning the cakes out to cool completely.


Once cooled, I wrapped the cakes in plastic wrap and threw them into the freezer for the night.

Saturday evening, once the little guy was in bed, it was time to get this cake together! I started by making my vanilla butter cream. I found this recipe on the Food Network's website, and I've found that making a batch and a half usually works pretty well.

Don't you just love my messy kitchen!?

Now it was time to assemble my masterpiece! I leveled off my cakes and gave them a healthy layer of butter cream between the cake layers and slapped on a coat on top of everything.


This is when I ripped open my package of fondant and went to work. I read that fondant will take on some of the flavor of the butter cream, but flavoring the fondant itself is also a good idea. If you are going to flavor fondant (and you want to keep it white), you'll want to use a clear flavoring. Wilton does make a clear vanilla extract, but I still had some almond extract on hand, so I poked a hole into my fondant, poured a little in and kneaded it like it was dough for a while...a long while. If I keep this up I'm gonna have some nice pipes!

Once my fondant was flavored, and kneaded enough to be rolled, I dusted my rolling surface with some powdered sugar and got to rolling. I needed to get the fondant rolled out to an 18 inch diameter. Once we were all rolled out, it was the moment of truth...getting this stuff on my cake.

I managed to get it onto the cake without tearing it...but I don't think I cut off the excess quickly enough, as I wound up with this:


I was a little disappointed, but I planned on decorating the cake with more fondant cut outs, so I figured I'd just cover up all the creases!

The little instruction booklet that came with the fondant said that I should wait 2-3 hours before I started decorating the cake....crap! It was already almost 9:00PM and I wanted to get to bed sometime before midnight. So, I started on the next part of my project and figured that would just need to be good enough!

In the event that my cake bombed, I wanted to have some backup...my backup came in the form of cupcakes...from a mix. In my defense, I did whip up a nice batch of cream cheese frosting (Thanks again Heather from SprinkleBakes) and tinted it pink, my mother in law's favorite color!

My kitchen was a freakin' mess!

Now it was time to decorate the cake! I tinted the fondant pink with some decorator's gel color and donned some gloves to knead in the color. I was really impressed by how well the color worked into the fondant (just like on TV)!

I used my circle cutters to cut out some decorations and applied the cut outs to the cake by brushing the back of the cut outs with water. This is where I employed some camouflage and covered up the creases in the white fondant!

I planned on decorating the cupcakes the next day and it was after 10:00PM, so I needed a break! I had an "only in Wisconsin" moment and washed down some cake scraps and butter cream with a beer. Don't turn up your nose...it was DELICIOUS!


The next day (after enjoying a blissful 20 minutes of extra sleep while my husband fed Fox his breakfast), I put everything together! Drum roll Please.....


Not only did it look great...it tasted great too! The almond extract reminded me of my Grandma's Christmas cookies and the birthday girl was tickled...wait for it...PINK! The other party guests loved the cake (and cupcakes), and there was only one piece left once the party ended!!


Final Verdict: I'm no longer afraid of fondant!! I know what I need to do next time to clean up some of my boo-boos. First, I will be sure to roll the fondant a little thinner, and second, I need to trim the fondant as soon as I put it on the cake to avoid creasing.

I plan to make another cake in a few weeks to hone my chops...but I will bring about another bread posting soon! 


Monday, July 9, 2012

Challah Back Girl

I'm back, and I've brought bread!

This weekend I sought out to make Challah. Challah is a special Jewish braided bread eaten on Sabbath and holidays. I chose to make the three-braid variation (there is also a 6 braid variation in my text book). I was excited for this recipe because I've seen Challa on Food Network before, but I've never eaten or made it.

As always, I quartered the recipe:

Bread Flour 21oz
Instant Dry Yeast 0.25oz (which happens to be one packet!)
Water 8oz
Egg Yolks 4oz (this worked out to about 6 egg yolks)
Vegetable Oil 2oz
Sugar 2oz
Salt 0.4oz
Bread Flour for dusting
Yolks Only Egg Wash (equal parts egg yolk, milk and a dash of salt)


The flour and yeast are mixed in one bowl, and the remaining ingredients are put into the mixer bowl, then I added the flour yeast mixture to the wet ingredients and mixed on low for 4 minutes, then increased the speed to medium for another 4 minutes with the dough hook attachment. The dough was firm and smooth, not sticky (thank goodness)!

My lovely dough went into my rising bowl to bulk ferment for an hour.I covered the dough ball loosely with some saran wrap and went to fold some more laundry and load the dishwasher.


After an hour, I gave the dough a gentle fold and divided it into 156g pieces. This was tricky, add a little, take a little away...I'm super anal retentive and a pharmacy technician. I wanted each piece to be exactly 156g, so this might take you considerably less time than it took me!

Then the dough pieces needed to be pre-shaped into small oblongs.

To make a small oblong, you press the dough out into a small rectangle with your fingertips, then bring the left and right ends to the middle, pressing to seal. Next, you fold the top half to the middle, press again, and bring the whole top to the bottom, sealing with the heal of your hand. Then you just go a little Play-doh on your dough and roll it into a chubby little roll about 3 inches long.

Now, we rest...again. Cover lightly with a tea towel and go take a walk for about 10 minutes.

Once rested, fold the dough oblongs over into thirds and start to make your ropes!


This was fun, but harder than you think! The dough ropes tend to spring back and shrink...once I would roll one out to a foot long and set it aside to start on the next one, I would look back and have a 10 inch rope, so make them longer than what you really need!

The directions didn't say to do this, I just thought it looked cleaner, so I hacked off the ends with my dough blade to make everything even...again, anal retentive!


Now to braid the bread. I lightly dusted my dough ropes in flour to keep them dry for braiding. You would think that you would pinch the dough together at the top and braid like you would hair, from root to tip. Nope! We start braiding in the middle, flip the braid around and finish the braid, pinching the ends to seal.

 
I put the dough braids onto a parchment lined baking sheet and gave them a light little brushing of egg wash and let the braids proof, covered about one hour. I've found the best way to proof dough is to start up my oven at about 100 degrees for a few minutes, then shut it off and put the dough in to proof. This way the dough stays nice and lukewarm and doesn't get too cold in my air conditioned kitchen!


Once proofed, I added another careful brushing of egg wash and threw these beauties into a 375 degree oven for about 20 minutes. I took them out once they were a lovely shiny, dark golden brown. And...a shocker! I actually let the bread cool completely before slicing! Check it out:


I was so pleased to have this turn out so well!! This is probably the crowning jewel of my blogging baked goods! The bread was perfect! Nice little pockets on the inside, tasty and a beautiful color!

Final verdict, I will be making this again! We toasted some up with butter and garlic and had it with lasagna for dinner and loved it! I think this would also make a fantastic french toast!